POSServer must be installed, configured and used on installations of two or more terminals.
The POSServer can be controlled by Site or POS Terminal.
To access the POSServer settings, go to: Setup > Global Options > Miscellaneous > POSServer.
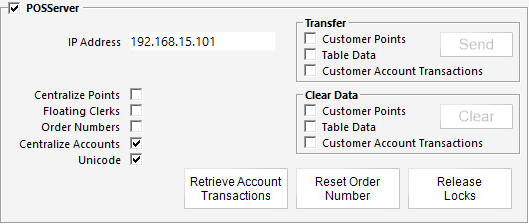
POSServer does not become active until the checkbox is selected next to the POSServer heading and the IP Address of the terminal running the POSServer Service has been entered.
Enter the IP Address of the terminal that the POSServer Service is configured to run on.
This field will only display on POS Terminals that are using POSServer Override settings.
This will allow only the terminals that are connected to the POSServer Override IP to be actioned when using the Transfer, Clear Data and Reset options.
If you are offering Loyalty Points to your customers, you can select this checkbox to ensure that, in the case of communications breakdown between the POS Terminals, customers cannot redeem more points than they are entitled to.
If you want to use the Floating Clerks feature, the POSServer needs to be configured and this checkbox selected.
This function can be toggled using a User-Defined button on the POS Screen in the event that the POSServer is offline.
Order Number range fields will not display until the checkbox has been selected.
Enter the range of Order Numbers assigned to the POS Terminals.
If you are using Customer Accounts, you can select this checkbox to ensure that all POS terminals synchronise Customer Account data with POSServer.
Enabling this option also ensures that a customer can only be in use at a single terminal at a time (preventing the same customer account from being added to a sale on multiple POS terminals at the same time).
After enabling Centralise Accounts, you will need to Transfer the Customer Account Transactions to the POSServer.
From the main POS terminal or back office, go to: Setup > Global Options > Miscellaneous > POSServer.
Under the Transfer section, enable the "Customer Account Transactions" option, then press "Send".
This will send all Customer Account Transaction data to the POSServer.
Once this has been done, restart Idealpos on all POS terminals for the change to take effect.
Note that using Centralised Accounts when multiple POSServers are enabled and exist at your site is not supported.
This option enables support for Unicode characters (such as Chinese or Arabic characters) to be displayed in POSServer/Ideal Handheld app/Pocket Pad app.
By default, this option is disabled as most customers won't require Arabic or Chinese characters.
We only recommend enabling this option if support for Arabic or Chinese characters is required in your environment; enabling this option may slightly affect performance on lower spec hardware.
This button will clear all Customer Account Transactions stored on the current terminal and replace with data from the POSServer.
Two examples which may require the use of this button are as follows:
Example 1 - Switching from Centralised to Non-Centralised Accounts
Note that we do not recommend continuously toggling between Centralised and Non-Centralised Accounts.
However, if required, you can utilise the Retrieve Account Transactions button when switching off Centralised Accounts.
The steps for completing this process are:
* Ensure that POS terminals are not being used for trade.
* Disable the "Centralise Accounts" checkbox, then close the Global Options window and close the Idealpos Suite.
* Start Idealpos on the terminal, go to Setup > Global Options > Miscellaneous.
* Press the "Retrieve Account Transactions" button and accept the prompt by pressing "Yes". If prompted, enter the Admin password.
* At this stage, you can choose one of the below options:
A. Go to the Miscellaneous tab in Global Options on each POS Terminal and press the "Retrieve Account Transactions" button.
B. Perform a Terminal Overwrite using the current terminal.
On the current Terminal, go to IPS Client > Network > Overwrite > Standard.
Enable the tickboxes next to each POS terminal that you want to send the overwrite to, then press "OK" to proceed.
Note that this will result in the chosen terminals being unavailable during the time when the overwrite takes place.
Example 2 - Changing POSServer IP Address (i.e. Setting up a new POSServer)
The steps for completing this process are:
* Retrieve Account Transactions from POSServer using the "Retrieve Account Transactions" button. This will clear the Customer Account Transactions on the terminal and replace with the most up-to-date transactions from the POSServer.
* Update the POSServer IP Address in Global Options > Miscellaneous so that it reflects the new POSServer IP address.
* Clear the Customer Account Transactions from the new POSServer IP address by ticking the "Customer Account Transactions" tickbox under the "Clear Data" section, then press the "Clear" button. You may be prompted to enter the Admin password.
* Transfer the Customer Account Transactions from the terminal to the new POSServer IP address by ticking the "Customer Account Transactions" tickbox under the "Transfer" section, then press the "Send" button.
This button will reset the Centralised Order Numbers to the first number specified in the Order Number Range fields.
If a POSServer Override IP has been entered, this will only apply to terminals that link to the Override IP.
A window will open to confirm you want to reset the order numbers.

Once completed a confirmation message will display.

This button will allow terminals to reconnect to the POSServer database if a request has caused data to be locked.
Data is locked when a POS Terminal accesses it for use to stop other terminals from accessing the same data.
If a POSServer Override IP has been entered, this will only apply to terminals that link to the Override IP.
A window will open requiring you to confirm you want to release locks.

A window will confirm the release has finished.

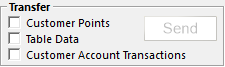
This field allows you to transfer Customer Points, Table Data and Customer Account Transactions from the local database to the POSServer.
It will only become available when an option is selected to be transferred.
This function is generally only used when first setting up the POSServer and you want to transfer all current local data to the POSServer.
This will only transfer what is on the local terminal.
If it is missing data for any reason, the data transferred will be incorrect.
If a POSServer Override IP has been entered, this will only apply to terminals that link to the override IP.
Use of this function will be protected by an Admin Password.
You can differentiate between transferring Customer Points, Table Data or Customer Account Transactions, or you can send all three.
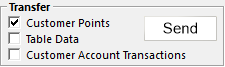
When you press ‘Send’, you may need to enter your Admin Password.

A message will display on screen to confirm the transfer of details.

POSServer will be updated with the new information and a window will display to confirm the transfer has completed.
Press OK to complete the process.

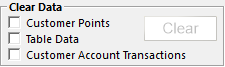
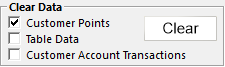
This function will allow you to clear data from the currently running POSServer.
It will only become available when an option is selected to be cleared.
No data will remain in the database that relates to Customer Points, Table Data or Customer Account Transactions.
This function is generally used when you are adding a POSServer that is new and the data contained in the database is not current and will be updated.
If a POSServer Override IP has been entered, this will only apply to terminals that link to the override IP.
Use of this function will be protected by an Admin Password.
You can differentiate between clearing Customer Points, Table Data or Customer Account Transactions or all three.
When you press ‘Clear’, you may need to enter your Admin Password.

A message will display on screen to confirm the clearing of details.

POSServer will be updated with the new information and a window will display to confirm the clear has completed.
Press OK to complete the process.

If your environment uses multiple POSServers within the same site, it is possible to segregate specific terminals from the Global Options POSServer and use a POSServer Override.
Centralised Points and Timeout will all be set from the Global Options settings however.
There is no limit to the amount of POSServers that can consecutively run within an environment.
It is a recommendation however, to use Sites where possible, or remove this functionality altogether.
To access the POSServer Override settings, go to: Setup > POS Terminals > Modify required Terminals > Miscellaneous > POSServer.

Enter the IP Address of the terminal that the alternative POSServer is running on.
You can set this for as many secondary terminals as you wish.
This checkbox will force the terminal to automatically attempt to reconnect to the POSServer in the event that it has been disconnected.